Tuesday, June 10, 2014

Off to the Strawberry Patch! (Freezer Jam Recipe and a Craft)

My day started bright and early capturing a few quick photos of Baby Girl. She is 10 months old today. *sigh* Time sure does fly!

I had just enough time to upload pictures before I grabbed the 4 year olds from my MIL's daycare and headed to the Pick Your Own Strawberry fields near my house. The kiddos were super excited. 


It stormed last night. That was not about to stop us. Kids like to get messy, right? 
So tromping through the mud we went! 

 After a little lesson on strawberry picking from me, they began to fill their baskets!


 Red from top to tip! That is the number one rule!


 It wasn't long before our baskets began filling up!


 Ready to mark where we stopped!


  Mr. Muscles needed to carry the baskets full of our berries!


 When we got home, we washed our berries and the used plastic knives to cut the green tops off to prep our berries for freezer jam.

I apologize for the lack of photos for the jam part. Having three helpers in the kitchen left me with no time to pick up the camera. This is the recipe out of the Dutch Gel pamphlet.
I pulsed the berries in my Ninja to mash them. You do not want to puree them.
Then measured out 4 cups of mashed berries.
We added 8 cups of sugar to the berries (Whoa!) and mixed it.
Meanwhile I added 2/3 cup of Dutch Jell (Clear Jell or Sure Jell will work also) to 1.5 cups of cold water and mixed.
I put that in a small pot on the stove and heated until boiling, stirring constantly.
When it boiled I dumped it over the berries and stirred for the recommended 3 minutes. Then transferred to jars and other freezer safe containers. This jam lasts in the freezer for 6 months and in the fridge for  3-4 weeks. Keep that in mind when choosing containers. It can be used as jam or ice cream sauce. You can make milkshakes with it too.

We made milkshakes with fresh strawberries and vanilla ice cream and just blended in the ninja until smooth. The kids were loving it.

For lunch we had PB and fresh strawberry jam! Along with some of our freshly picked strawberries.


 But we did not end the fun there! After rest time, it was time for a strawberry craft.
 Kiddos cut out a strawberry shape by folding a piece of red paper in half and drawing a half heart shape on and then cutting it out. Then traced their hands onto green paper and glued it on as the top of the berry. Then they dotted glue all over and added glitter for the seeds. We twisted green pipe cleaner to resemble the vine and added a string to hang.
 Cute! Now I need a nap! 


Friday, June 6, 2014

Preschool: Name Books

I want to share my most successful project that I implemented into my classroom this year. They are called "Name Books". Last school year, I realized that while I was working with the children in many different ways to learn how to write their names, many could not spell them or do it without a name tag. My goal was to be more intentional about name writing and spelling. I perused my pinterest board with all my name writing ideas. They all had merit. The problem was there was no organization to it. No way to see progress. I decided I wanted to keep each student's name practice all in one place to see progress. Also to have something at the end of the year to take home and be proud of.   By the end of the year, most children were able to complete their name more legibly without help of a teacher or name tag.

I saw huge progress this year. The books made everything feel more intentional and organized. I had a lot of parents compliment the idea. 

I purchased these notebooks from Discount School Supply.

They work best if used horizontally. 

I dated and labeled each page as we completed a task. Below are a few pages from our book. We did one page a week. I recommend starting out with a "first try" writing. Then begin spelling the name before writing it. We did this by putting our names in order with the help of our name tag. Each time a student completed an activity, they earned a sticker for the front of their book! 

Some of the individual activities were original and others were found on pinterest. Click into my board for links to the original posters. http://www.pinterest.com/tinkerbell9428/preschool-name/


 I wrote the children's names in yellow highlighter and they traced it using paint and q-tips. (Stickers were earned each time they completed an activity in the book. )Activities were sometimes done as a group at Table Time or individually during free-play.
 We use Handwriting without Tears as our writing curriculum. We had a OT come in that works for HWOT and he told us that kids should be tracing whole letters, not dotted or dashed lines. He also provided us with some gray squares that help the kids get the idea of spacing and how to write the letter like we build it on the blue HWOT mats.  I made each child a small gray-squared name tag and laminated them. They could grab these and use them when spelling and writing their names.
 One of our first activities included children cutting apart the letters of their name (that I had pre-written) and then gluing them into their book in order. 


 Another early activity was for kids to find glue their name in order in their books. This was around Valentine's Day.
I asked my facebook friends for any half used sheets of ABC stickers taking up space in their scrapbooking storage. Kiddos searched for the letters of their name. We did this during our animal unit, so we called it a letter safari!
 I often programmed pages with "Trace and Try" They traced what I had written and then gave it a try on their own. I did this at least once a month. 
 Lines and boxes
 Rainbow Writing: students trace names several times in several colors.
 Fill in the blank.
 Honing in down. 
 Students searched for the letters in their names and then stamped them into the book. Lots of fun!


For letter R week we made name rockets. I suggest having the students count the letters of their name first, glue on the correct number of squares second, then write their name accordingly. This worked better than having them write it first. 
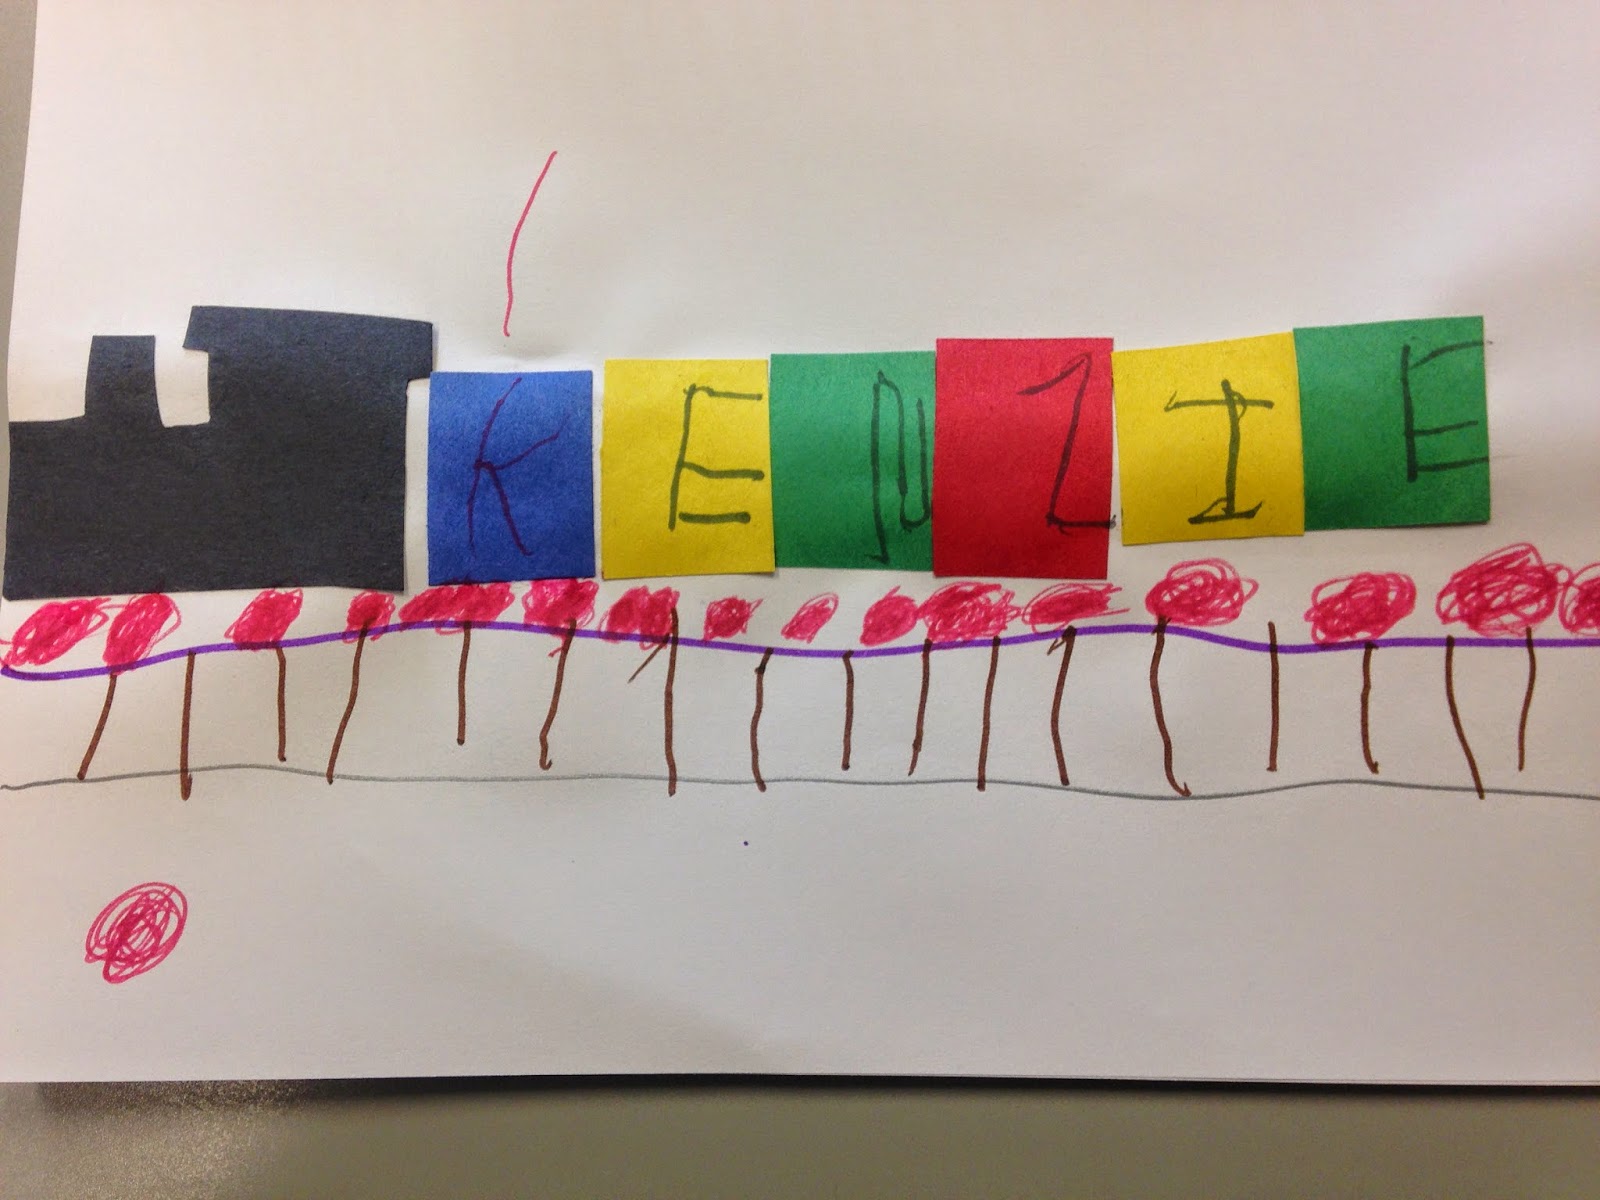
Name Trains for letter T week. Same thing as rockets, count, glue, write. 
Letter repetition. 

Letter Snowman, count, glue write. 

I hope you find this useful! 


Monday, May 12, 2014

Preschool: W is for Whale in the Water


Love this little craft! It can be adapted to suit kiddos of all different ages.
 Since I have 3 and 4 year olds and we were completing this as a group, I cut out the whales for the kiddos and had them ready.  Older kiddos could certainly cut out their whales themselves.

I used this whale temple and traced them onto light gray paper.

I gave each child a half sheet of light blue construction paper, one pre-cut whale, and one third of sheet of dark blue construction paper programmed with curved line to represent waves/water.


Each student started by cutting out the "waves" and gluing them to the bottom of the light blue sheet of construction paper. Then they glued the whale to the waves. Next we added an eye and mouth and I helped them draw a  "W" in glue to represent the water shooting out of the blowhole. The last step was sprinkling blue glitter onto the "W". And there you have it! A "Whaley" cute craft! ;)


Friday, May 9, 2014

Preschool: Mother's Day Vase of Flower


 To make this simple and adorable Mother's Day Craft, students cut out vases from construction paper and glued them onto the bottom of a full sheet of  construction paper. Then they dipped flower shaped cookie cutters into paint and made prints on the top of the paper. Then we made stems by running a line of glue from the flower to the vase and sprinkled it with green glitter. Finish it off by writing "Happy Mother's Day". Don't forget to have the kids sign them and add the date.


Tuesday, April 8, 2014

Preschool: Q is for Queen Bee

I was looking for sometime different than painting quilt patches for the letter Q in preschool. I am also at the beginning of our bug and insect unit, so making Queen Bees just seemed right!


I was going to cut out little crowns for each student, but found the cupcake wraps at Michael's and decided that if I cut them into thirds, they would make perfect crowns for our Queen Bees! ( I was glad I did not have to cut them out by hand too!) Paper doilies would also work!

Grab:
cupcake wraps (not cupcake papers) or doilies
paper plates
yellow paint (we finger painted ours!)
black paint
black construction paper circles for the heads
wiggly eyes or eye stickers
paper mouths cut out of red construction paper
pipe cleaners
contact paper
glitter
glue

Go:
Cut each paper plate in half and paint yellow. While they are drying, cut out wing shapes from contact paper. Sprinkle with glitter and back with another piece of contact paper trimmed to fit.
Make bee faces by gluing on mouths, eyes, pipe cleaner antennas, and crowns.

When yellow paint is dry, add stripes and staple on head and wings. BUZZ!!!!

Friday, March 21, 2014

Preschool: Helping Hands

I know I have been MIA lately. Thanks for sticking with me! Adjusting to Mommy life with this sweet baby girl has been interesting, but I am loving every minute!
I thought I would pop in to give you an idea that I tried for the first time in my classroom this year and it has worked out well! I have always hated "Helper Charts" because I felt that it was a lot to keep track of. But I saw this idea on pinterest and decided to give it a shot! 


I am in love with it! It has simplified my day! Instead of having a:
-Line Leader
-Calendar Helper
-Bell Ringer
-Snack Helper
Etc, etc, etc 
I now just have one Helper of the Day or Helping Hand!!! 

It is super simple. One the first day of class each kiddo painted their hand and pressed it one a quarter sheet of white construction paper. I cut out each hand and labeled them with each kiddos name. Then I used a hole punch on each hand and put a binder clip through them. I hung them to my closet with a magnetic hook. Flip it each day and viola! One person to help me whenever for whatever is needed! Give it a shot to simplify your life! ;)

Friday, December 6, 2013

Dear Baby Girl: My Dream for You

Dear Baby Girl, 
   I have dreams for you. I have hopes for you. I want to give you a good life. I want you to be generous. This may be the greatest gift that you can give yourself. Giving of your money, things, time, talents...it blesses others and blesses you too. It makes you feel good inside your heart. That is God’s way of letting you know you are doing something right and good. 

   I want to you think about others. How they think, what they must be feeling. Be compassionate, be loving, be like Jesus. Love like Jesus. Sometime as adults we have shallow philosophies. We think that we cannot like or love someone who thinks differently than us. We shy away from those who are look or act differently.  We sometimes forget that God created all people and Jesus asked us to reach them with His love. Baby Girl, we can still love those people with the love of Jesus. We do not have to agree with them, or participate but it is not our job to punish them. Show them kindness, show them love, show them Jesus. 

  I want you to be compassionate. I want your heart to be big. I want you to consider others. I want you to take nothing for granted for it all can go away at any moment. 

  When you have nothing, I want you to be thankful. When you have plenty, I want you to be thankful. Remember that there is always someone who has less than you have, who hurts more than you hurt, who struggles more than you struggle. Pray for them and have a thankful heart. 

  I want you to be happy. A happy heart can be found by being generous and thankful. It can be found by loving others and taking care of them. It can be found by sharing Jesus. It can also be found by being content. Baby Girl, this is a hard one. Contentment is becoming a lost state. We always want more, want bigger, want better. That can be a great thing when striving to meet a goal. It can be a detrimental thing when we put our wants before others needs. Or when we constantly feel sad and restless because we are never satisfied with what we have. We never enjoy today because we are too busy waiting for tomorrow to get here. Take time to stop and be happy with today, with a moment. Even when your circumstance is not ideal or even very hard, find something to be content with. Something that satisfies you. Be patient in those times, because I promise it is a small part of your journey. Follow God and keep Him with you and He will always see you through. You can have a happy heart even when things seem to be falling down around you. It is very much a choice. Something that has to be worked at or strived for sometimes. Sometimes it is very easy to be content, everything seems right in your world. Other times you will struggle to find one thing that you can be happy about. Keep looking, it is there. 

  I want you to smile. A smile says so much about you. It says so much to other people. A genuine smile that is filled with compassion and hope and love can be that one thing in someone’s life that gets them through the day, that gives them hope. Baby girl, a smile is free but is priceless as well. 
I want you to have dreams and goals and work hard to meet them. I want you to find joy in the journey. I want you have a sense of accomplishment. I want you to succeed. But I also want you to fail. As hard as that is for me to say, the truth is there will be things in life that are hard for you, things that you will not be good at, things that hurt. You practice more, fight harder, decide not to give up. You learn through failure. You learn compassion and empathy from your experiences. Your failures do not have to define you, but it is up to you to decide that. I want you to choose to let them make you better. 

  I want you stand up for those who cannot stand up for themselves. I want you to strive to be selfless. I want you to serve others. 

  I want you to know who you are in Christ. He created you; He has plans for you. Tune in to Him. Follow Him. Love Him. Love Him more than you love Daddy and me. Love Him more than you (will) love your husband. Know His word. Believe it. Share it. Stand up for Him. Loving Him will make all the other things easier, natural. 

  Baby Girl, people will take advantage of your generosity. Use your discernment, but keep giving. Your compassion may cause you pain. You may become a bully’s target after standing up for a friend. Don’t let that hinder your kind heart. Not everybody is going to like you, and you will not understand why. Don’t worry about it. Remember who you are in Christ. There is nobody in this world that owes you anything. Remember that. Be thankful for even the little things. Work hard for the things that you want. Smile and laugh. It is good for your soul and for others. Go on adventures, read as much as you can, pay for a stranger’s coffee, dance in the rain, and love Baby Girl. Love, love, love. It is truly the greatest gift you can give. 

I Love you more than you can fathom, 
Love,

Mommy