~Praise the children and they will blossom~ Just a preschool teacher being grown by the kiddos in my life. I am blessed.
Thursday, June 30, 2011
It's a Circus Around Here!
Another great find at Michael's this weekend... Rubber circus stamps for 50 cents each! I grabbed four and picked up some red and white striped paper while I was there. I haphazardly cut the red paper to look like parts of a circus tent. They did NOT exactly turn out how I envisioned. Oh well. The kiddos glued down their tents and then stamped the circus animals in the tent. :) :) :) They turned out super cute! This was easy and inexpensive. It kept the kiddo's attention for nearly a half an hour. 

Wednesday, June 29, 2011
A Patriotic Kind of Lunch
Stars and stripes for lunch today.
I used a cookie cutter to cut bread in the shape of a star, then toasted it.
The butter is just softened and dyed with a few drops of food color.
Syrup in the corner cubby for dipping their stars. (This is the kiddos favorite version of french toast)
Red Seedless grapes.
Strawberry yogurt with Blueberry syrup. Find the recipe for the blueberry syrup here.
I used a pizza cutter to cut 'stripes' of cheese.
Simple, fast, fun!
Monday, June 27, 2011
Cars, Trains, Trucks, and Planes!
Wheels, Watermelon and Whales
For lunch today we had simple sandwiches cut in the shape of a race cars ( used a cookie cutter) with wheels made out of watermelon balls. They also had spiced cookies in the shape of 'wheels' and some whale crackers and some cheese in the shape of a flower. Everybody cleaned their plates and asked for seconds! :)
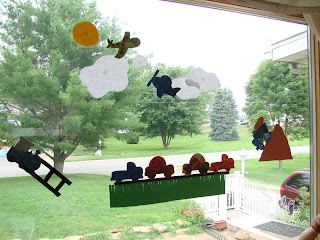
Following lunch, it was time to do some crafts. Over the weekend I picked up some cardstock die cuts in the shape of cars, trucks, plaines, etc. I got a pack of like 30 shapes for 79 cents at Michael's yesterday. Love me a deal! So Everyone chose a form of transportation and decorated them with the handy-dandy dot painters. (you can use bingo blotters or DO-A-DOT painters as well). After they were dry, we used construction paper and some electrical tape to make a scene on the picture window. The whole thing was quick and easy! And the window looks beautiful!
Kids at work!
VROOM!
The completed window scene!
Chug-a-chug-a CHOO-CHOO!
The highway is all backed up!
Ry's dump truck is full and he is on his way down the dirt mountain!
It's a bird! It's a plane! It's Superman!--- NO, wait... it is just a plane!
It makes me happy!
Thursday, June 23, 2011
Making Food Fun
I am a huge believer that getting kids involved in the kitchen promotes curiosity and confidence. I also believe that it makes them more willing to taste new things. I also think making food fun for the kiddos is another way to get them to try new foods, or the same old thing again... until they really decide if they like it. It takes several times of trying something before we can really determine whether or not we like something. As you get older, your taste buds loose sensitivity, which makes you less picky. So encourage your kiddos to keep trying things. In my house, we have a rule. A "Thank You" bite. We remind students and daycare kiddos that we try everything to say "Thank You" to whoever prepared the food. One decent bite. :) Here a couple ideas to make food more fun!
Use cookie cutters to turn cheese into fun shapes!
Choose Wacky Mac or other fun noodles and call them "Butterflies!" Buttered Butterflies are a FAV around this house!
Throw a piece of spiral string cheese on the plate and call it a caterpillar. Paired with the butterflies, you can open up a conversation of the life cycle of a butterfly!
For more fun food ideas, check out these previous posts, Ladybugs for Lunch, Watermelon Waffles, Tye Dye Cake, Birdhouse sandwiches
Wednesday, June 22, 2011
Under the Sea Play (and a short rant about the plural of 'octopus')
But, back to the chaos... today the kids spent most of the morning bargaining to get outside for a while. While I was making lunch, I allowed them to go out (I can see them in the yard from the kitchen.) Of course it was only 5 minutes later that the claims of "heat exhaustion" came. I made them stay out for a while anyway. But I knew it was way too muggy to go back out after lunch. So, I pulled something from my teaching stash. I am CRAZY about Toobs. They are small toys that can be found at most hobby/craft stores. Use a coupon and get a Toob for less than 5 bucks. LOVE IT!!!
I am a huge fan of sensory play, so I pulled out the Boats and Ocean Life Toobs, filled some random containers with water, tinted them blue with a few drops of food coloring and then the fun began!
Here are some of our Toob Toys
Our octopus underwater. Radom useless fact: Did you know the plural of 'octopus' is 'octopuses', NOT 'octopi'. It is one of the most common plural mistakes in english, basically because it is derived from the Greek word 'octipode'. The plural would then be 'octopi', but not in english - it is just 'octopuses'- which innately bugs me to no end. I prefer 'octopi' but refuse to speak so incorrectly. ~whatever, right?~
Starfish, octopus and eel underwater. Coolest thing about the Toobs, are the toys have their proper name on the bottom, so I look smart when I spout off each type of animal and boat. ;)
Seriously, they played forEVER!
On a side note ( I know, you are thinking, "not another one!") The Toob toys come in a tube, but it is not meant to keep the toys in, it is just packaging. So I a huge fan of reusing and upcycling. So here is a tip. You know the containers icing comes in? They are too nice to toss when I am done with them, so I wash them out store our Toob toys in them. The great thing is you can label them with a sharpie you so know what is in the container without looking :) :) :)
Monday, June 20, 2011
Worms, Ladybugs and Flowers for lunch!
Flower and leaves are made out of cheese.
Worms are Ramen Noodles.
Ladybugs are watermelon balls with mini chocolate chip spots.
Enjoy!
Saturday, June 18, 2011
Justin's Favorite Chicken (mine too!)
Yummy, easy, versitle. Doesn't get much better than that.
Sorry about the measurements, I am just guessing... I have a bad habit of creating dishes on a whim and just tossing stuff in until it tastes good. I make this quite often, so I just sorta do it on auto-piolet.
You will need: (makes 4 servings)
3 or 4 large boneless, skinless chicken breasts
2-3 Tablespoons of honey
season salt
ground mustard
ground red pepper OR chili powder.
Cut up chicken into small cubes. Put half of the honey into a large dish or bowl. Stir the chicken into the honey. Add the rest of the honey and stir again. Give a few good shakes of season salt and ground mustard on the chicken and stir. Add some ground red pepper flakes, OR chili powder... I use about 1/2 teaspoon. Cut it to 1/4 teaspoon if you like less spice... or add more if you like spice! If you are not a fan of spicy foods, then add regular pepper instead. Stir. Heat about 2 TBSP of oil in a skillet and heat it over med-high heat. Add chicken in a single layer. DO NOT STIR. Let it get nice and brown 3-5 minutes, then flip chicken and finish cooking on the other side.
I serve this with a variety of "fixings" to make sandwiches including, bacon, cucumbers, red bell pepper, hardboiled eggs, lettuce, ranch dressing, onion, etc. It is easy and yummy!
Friday, June 17, 2011
Come on in Sunshine!
Busy day today! We made Suncatchers for a craft today. It is very easy and not very time consuming, especially if you buy pre-cut tissue paper squares.
You will need
-Construction paper
-Clear contact paper
-Tissue paper squares
-Glue
-String
-Hole punch
Start by cutting the center out of your construction paper. It really can be any size paper you want. You can cut any shape out of it too! I put two pieces of paper together and fold it in fourths. Then I cut the center out of it. Now you have two identical "frames".
Next cut clear contact paper to size. It should be about the same size as the frame. Peel the backing off the contact paper and lay it sticky side up on the table. Lay one of your frames on top of it and press down. Next use the tissue paper squares (you can buy them here) and place them all over the contact paper in whatever form or fashion you please. When finished, place another piece of contact paper, sticky side down, on top of the exposed tissue paper. Glue your 2nd frame on top. Punch a hole, string it up and hang it from your window. Or just hold it up there until you can locate the hole puncher, like we did! Ha! Beautiful, Colorful, Happy!
We also had birdhouses and birdseed for lunch with our Spaghetti-Os! Not the greatest work, but hey, I had a bunch of chirping birdies wondering when lunch was gonna be ready!
You will need
-Construction paper
-Clear contact paper
-Tissue paper squares
-Glue
-String
-Hole punch
Start by cutting the center out of your construction paper. It really can be any size paper you want. You can cut any shape out of it too! I put two pieces of paper together and fold it in fourths. Then I cut the center out of it. Now you have two identical "frames".
See, just like this one ;)
Next cut clear contact paper to size. It should be about the same size as the frame. Peel the backing off the contact paper and lay it sticky side up on the table. Lay one of your frames on top of it and press down. Next use the tissue paper squares (you can buy them here) and place them all over the contact paper in whatever form or fashion you please. When finished, place another piece of contact paper, sticky side down, on top of the exposed tissue paper. Glue your 2nd frame on top. Punch a hole, string it up and hang it from your window. Or just hold it up there until you can locate the hole puncher, like we did! Ha! Beautiful, Colorful, Happy!
We also had birdhouses and birdseed for lunch with our Spaghetti-Os! Not the greatest work, but hey, I had a bunch of chirping birdies wondering when lunch was gonna be ready!
Thursday, June 16, 2011
Tie Dye Cake
I love color! Color = Happiness. It is an instant reminder of the beauty of God's creation. Color makes the ordinary interesting. For example, take a plain white cake. Let's say coconut flavor. Now picture it with white icing. Yummy for the mouth, but not so much for the eyes. Now picture that same cake with splashes of electric green, vivacious pink, and deep teal. It looks better, which makes it taste better right? I eat with my eyes, as do most kids! If you want to get them to try something new, get creative with it! Try Watermelon Waffles, for instance. Kids eat with their eyes, try to appeal to them!
Another way to get them to eat, is to let them get involved in the kitchen! I spend the entire month of March cooking with the kiddos at preschool. They LOVE it! Today the daycare kiddos made Tye Dye Cake! Yummy! And super simple!
Start with a white cake mix ( I had coconut cake mix on hand, so I used it.)
I wanted a really white background to my colors, so I only used EGG WHITES. My recipe called for 3 large eggs, which I converted to 5 egg whites. ( Normally you would use 2 egg whites per 1 egg called for, but my eggs were large) It worked perfectly. I followed the rest of the ingredients per box directions.
Then I separated the mixture into 4 bowls. (Actually, I left 1/4 of the mix in the mixing bowl and used it as the white batter. The remaining batter was in 3 small bowls. I used GEL food coloring. DO THIS!!! BUY EVERY COLOR OF THE RAINBOW IN GEL FOOD COLOR! You can find it in the cake decorating section of craft stores. You will not regret it. The colors are so much more vibrant and it will not water down your recipes. Anyway, I left the kiddos mix the food coloring into the separate bowls. We used green, pink and teal.
Spray or grease a 9x13 cake pan (you can really use any size that suits you!) Dump some white batter directly in the center of the pan, about 1/4-1/2 cup. Next layer up the colors in whatever order your little heart desires right on top of each other. 1/4-1/2 cup at a time. Here is an example after the white and teal. By the way, I let the kiddos spoon the colors on, which of course they thought was grand!
Now keep going... go ahead, it will spread on its own. No need to mix, swirl or spread. It will do it by itself!
This is after our first go of colors. Beautiful, huh? I love it. Makes everything in the world seem right.
Keep going, layer them up... don't worry if the kiddos get a little creative. It just makes it all the more interesting!
Gorgeous! And so much fun! Just think of all the memories you are making with the kiddos. What? No kiddos... it is okay. Make this yourself! It will bring that happy kid right outta you!
Bake according to the box. Let cool completely before cover it with icing. :)
Here is our baked caked... just wait, don't dig into it yet!
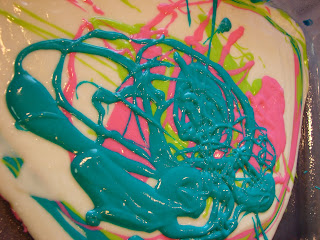
No words can express how happy this colorful cake makes me! It is just a joy to look at. Feeling blue? Bake a tye-dye cake!!!! BUT, we are not done yet! We need icing! Boring white icing? NO! Swirly colorful icing? YES! First icing the cake as usual with white icing. Then put small drops of gel food coloring all over the cake and GENTLY swirl it around.
Doesn't have to be perfect, just go with it! :) :) :) :) It will make you happy!
Now this is the most important part, Cut and EAT THE CAKE!!!
Subscribe to:
Posts (Atom)


